Stitching a Yin Yang Block Tutorial — Lots of Photos

It was inevitable.  I had to try out a Yin Yang block in my favourite of fabrics, shabby chic. As I have been asked some questions about how I put these together, I decided to do this little tutorial. The block is composed of four pieces of one identical shape. All the photos can be enlarged by clicking on them.

This shows the back of one piece and, if you click on the photo to enlarge it, you can see the matching points. They are what make this block go together like magic. I tried doing them before the Inklingo collection came out, and no matter how fine a line I drew or the matching points I put on, it just wasn’t fine or precise enough. With Inklingo printed matching points and crosshairs, there’s no worries at all — it all just fits together like a dream. I clip between the matching points on each concave curve to a few threads above the stitching line.

There are other ways to stitch these. My method is to start at the large curved end of the piece. I use two #12 sharps and pin at the crosshair and then at the first matching point.

I start by making my quilter’s knot and inserting the needle a stitch length over from the crosshair. I’ve found this works well when joining other pieces as the knot is not right at the crosshair. Then I take the needle to the back, back through to the front at the crosshair, make a quick back-stitch and carry on down to the first pin/needle. There are a lot of matching points and they are the secret to making the curve as smooth as can be.

As each matching point is reached, I take a little back-stitch and keep stitching. With a curve like this, I try to use the smallest stitches I can.

This photo shows the clips into the seam allowance done on the concave seam allowance of one of the pieces.

Once the first two pieces are stitched together, this is what they look like. As I’m hand piecing, I leave the pressing until the end.

Having stitched a few of these blocks, I’ve found that stitching them together into pairs and then joining those pairs works best for me.

The next step is joining the two pairs together. Once again, I start at the large, curved end and pin with two #12 sharps — one at the crosshair and one at the first matching point.

After stitching the third seam, the block now looks like this.

I line up the fourth and final seam and pin through the crosshair and first matching point.

Start with the thread slightly over from the crosshair and take the needle to the back.

As this is the last of the seams to stitch, I circle the intersection by inserting the needle through the first pair of fabrics at the crosshair and drawing it through. Circling the intersection ensures that there’s not a little hole at the intersection of all four shapes.

Then the needle is drawn through the next pair at the crosshairs.

The needle is drawn through the final pair at the crosshairs, a quick back-stitch is made and all that’s left to stitch is the final seam.

Daphne, who hasn’t been seen often since her flapper adventure on the roof garden a few years ago, showed up to see the block when the stitching was finished. At this point, the block hasn’t yet been pressed.

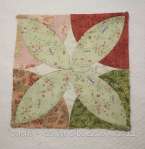
The block presses like a dream and the magic happens again. The block lies perfectly flat. No bump in the centre, no distortion.

The back of the block after pressing. Don’t you think it would be fun to stitch one of these? Be warned, though. They’re addictive as can be to stitch. You can’t stitch just one. I’ll be back with another post this afternoon with a giveaway that’s related to this tutorial.

Smudge wasn’t all that interested and decided to have a nap on my desk chair.

Another Contented Kitty Block and Playing with Fabric

One more Contented Kitty block to add to the collection. They’re just so much fun to stitch that I can’t resist. I have enough pieces printed and cut now for another 3 or 4 blocks. There are other brown and gold fabrics I want to add to the mix. Before I stitch any more of these blocks, I’m going to print on the other fabrics and mix them all up.

Wednesday night I was sorting through one of the containers in which I keep pieces I’ve printed and cut and ran across these edge shapes for clamshells. I have no idea what I had in mind when I printed them (note to self: make notes of what you’re thinking!) so decided to just have some fun stitching the little shapes. Curved piecing and tiny blocks — what more could I ask? Each of these blocks finishes at 3″. I think these will be perfect for a mini quilt.

We went from a humidex reading near 40C on Tuesday to a high this morning of 11C. That’s a huge change and completely explains the migraine I’ve been battling for the last 24 hours or so. It was brilliantly sunny on Wednesday but very windy and the wind continued through the night.

Smudge wasn’t affected by it at all.  He was too busy posing for the camera.

Contented Kitty Block

Much as I’m trying to concentrate on just one project right now, I can’t resist these Contented Kitty, aka Yin Yang, blocks. They are incredibly satisfying to put together and so quick to stitch. While I want to get the Contented Kitty quilt done fairly quickly, I’m contemplating doing some of the blocks in my favourite shabby chic fabrics. It’s so much fun to see how different they look when other fabrics are used. Then I keep thinking that they’d be amazing done in a variety of batiks and hand-dyed fabrics.

The possibility of doing a quilt using just 2 fabrics also intrigues me. I have a feeling the effect would be rather spectacular when the blocks were all joined together. The Inklingo Yin Yang collection makes the idea of doing a few different small quilts using this block completely possible. I wouldn’t want to try making these without it.

The press like a dream and the back looks almost as good as the front.

I laid out the pieces for another Contented Kitty block. Every time I stitch one, I”m as fascinated as I was by the first one.

Tuesday was incredibly hot, with a humidex reading of 39C. Out on the roof garden it was quite breezy and the heat wasn’t quite as oppressive.  I think today we’re going back to more normal temperatures, but it was sure nice to have that first real taste of summer.

Smudge was lounging.

Another Spring Circles Block

When I made one block last week, I really didn’t intend to make another right away but I couldn’t resist. They are fun to stitch. Doesn’t hurt that it means I’m working with my favourite shabby chic fabrics again and that this block has it all — curved piecing and continuous stitching.

After pressing all the seams in one direction the block lies flat as can be and the back looks almost as good as the front.

After what seems like a long cool and damp spring, we are in the midst of a mini heat wave.  Yesterday was gorgeous and hot.  Today the forecast is for a humidex reading somewhere in the high 30s or even as much as 40C.  I’m not complaining after all those weeks of rainy cool weather.  In fact, if we don’t get thunderstorms this afternoon, I plan to spend some time out on the roof garden soaking up the warmth.

Smudge was quite content after his yogourt treat.  Mr. Q.O. is working on the video of him drinking.  As soon as it’s uploaded, I’ll post it.

Two More Dresden Plates

Two more finished on the weekend. That’s 5 complete now, and now the decision has to be made as to the layout, as the ideas I have don’t require more full plates but rather half and three-quarter plates.  That will be a decision I have to make this week, as I really don’t want to stop making them for any length of time.

Finally – finally! – I managed to learn enough in EQ to design a quilt. I’m thrilled!!  It has been years that I’ve had EQ but had never really gotten anywhere with it. This weekend I just sat down and worked my way through it and was so pleased at the end. Now I understand why people like it so much — I was so tempted to play and design a few more quilts once I had made it through the first one, and have a feeling I’ll be doing just that sometime today.

We’ve had what seems like weeks and weeks of rainy weather, which has meant very little in the way of adventures for Hugo. He was helping Mr. Q.O. do a cryptic crossword the other day. It’s about time for Hugo to leave here. However, I’m a bit concerned about sending him off anywhere as there’s the threat of a postal strike here and I’d hate for him to end up languishing in a box in the post office while a strike is on.

Smudge was absolutely tuckered out after one of his sessions at the water bowl on Sunday. Mr. Q.O. managed to get a video of him drinking which will be edited and posted sometime this week.


Summer Plates

Thursday was yet another day of rain.  Today is supposed to be more of the same. While I am determined to keep making the red and white Feathered Star/Sunflower blocks, I had a migraine Thursday and wanted something simple to stitch.  These Dresden Plates are the perfect project for times like that.  I’ll make a few more full plates and then start adding half and 3/4 plates as well.  The design is all figured out in my mind and I don’t think it’s going to take long to put together.

I got all the blades cut out and ready to stitch.  I love the cheerfulness of these little plates.  I think it will make the perfect summer quilt – perhaps for a picnic out on the roof garden.

For the first time in months, Smudge decided he wanted his yogourt treat.  Mr. Q.O. and I stood in the kitchen for ages watching him lap it up.  Earlier Thursday afternoon, I walked into the kitchen and saw this – Smudge stretched out on the floor, and resting his head on the water bowl.

Three Red and White Blocks

Three red and white Feathered Star/Sunflower blocks, that is.  The more I stitch these, the more I’m enjoying them.  I’ve established a stitching sequence that is making them relatively quick to stitch by hand.  First I put together the “snake” of HSTs, squares and diamonds that form the feathers surrounding the kites.  That’s just lots and lots of continuous stitching, which makes the process a very quick one. Then I add the kites to the feathers, add the large QSTs to the sunflower centre and then stitch the kite/feathers around the sunflower block and all that’s then left is to add the outer squares and triangles and the block is done.

Three more blocks to go and I’ll have the six needed for the quilt top I’m making. I’ve started the next one and hope to finish it, except for the outer setting pieces, either tonight or Thursday night.

Don’t these shapes look intriguing?  They’re left over from cutting out Yin Yang shapes and the blades for the Dresden Plate I’m working on.  I can’t bring myself to throw them out as I keep thinking there has to be some use for them, particularly the sort of teardrop shape.  The smaller ones may just end up being glued to a blank greeting card to make some very original cards.

Tuesday night we think we discovered why Smudge pulled the toy basket over close to his kitty bed.  It was so he could use it as a pillow of sorts.

Bright Yin Yang Blocks

I just couldn’t resist and had to see how the Yin Yang block would look in brights as well as the spice fabrics. These blocks may be the beginning ones for a stitching book cover or, who knows, maybe I’ll make a small Yin Yang quilt of primary colours.

I still can’t get over how wonderfully the blocks press, so have to show the backs:

Yesterday I had a link to the collection in my post, but it didn’t work.  Here’s the correct link for the Yin Yang collection.

Sleepy Cat Hollow left a comment on yesterday’s post with a suggestion for another name for the Spice or Chocolates and Caramel quilt that I loved — Contented Kitty, saying that it looked like Smudge curled up in his kitty bed.  So now I think that quilt will end up being called Contented Kitty.

Smudge likes to lounge by the water bowls before he sticks his head right in the water.  Mr. Q.O. got this shot of him just before he moved over and put his head in one of the bowls and was dripping wet.

Spice or Chocolate and Caramels Quilt Beginnings

Ever since I saw the Yin Yang block on Barbara Brackman’s blog months and months ago, I’ve wanted to stitch it.  On Sunday, a new Inklingo Yin Yang collection was released and I had to dive right in!  The fabrics I had set aside for the Spice quilt were back out, I had the shapes printed and cut out in a matter of minutes and a few hours later, four blocks were done.

About a month ago, I tried to prep pieces to stitch this block with freezer paper templates.  In the past I’ve used freezer paper templates without problems, but for this shape?  It just wasn’t working at all.  When stitched together, the block had a rather tent-like look that was impossible to get rid of no matter how much I pressed it.  My stitching lines and matching points just weren’t anywhere near perfect or fine enough.  But with Inklingo printing the stitching lines and matching points, it was easy as could be.  So I was absolutely overjoyed when the collection was released.

They press like a dream and, once pressed, are perfectly flat.

I’m torn now between thinking of this as the Spice Quilt or Chocolate and Caramels. There are tons of fabric choices one could play with working with this shape — batiks and hand-dyed fabrics, ’30s repros, shabby chic, black and white, primary colours. The list just goes on and on.  I have an idea for a baby quilt made with this shape which will be very fast to stitch as the blocks almost put themselves together.

Smudge was nowhere near as excited as I was about these new shapes.  He’s happy as long as he’s curled up in his kitty bed with the toy basket nearby.  Sunday night I was watching him as he ever so slowly put both front paws in the toy basket and dragged it over closer to the kitty bed.