
I’ve been meaning to do this for ages and have run into all sorts of roadblocks. The biggest one was the fact I had made very detailed notes and taken loads of photos – all of which are on a … Continue reading

I’ve been meaning to do this for ages and have run into all sorts of roadblocks. The biggest one was the fact I had made very detailed notes and taken loads of photos – all of which are on a … Continue reading
I was at least halfway through making the blocks for the Garden Gone Wild top before I finally realized just how much fun I could have with these blocks as they’re not only all curved piecing, but almost all continuous … Continue reading

When I start a Patchwork of the Crosses block, particularly if I’ve done some fussy cutting/printing and the orientation of the shapes is important, I like to lay the pieces out on a page of my stitching book. That way … Continue reading
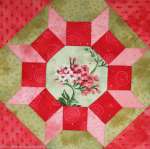
All we’ve heard for the past few days is that there’s a big snowstorm headed right for us so I decided yesterday I needed to make a block that really felt like summer. So pinks and greens were my choice … Continue reading
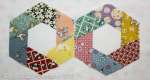
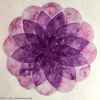
Another block I wanted to try out was the twisted hexagon. It’s a very fun little block to stitch, made up of one hexagon and six “other half” hexagons of the same size. As I had some of the other … Continue reading

When piecing by hand, I’ve always tried to get my quilter’s knot slightly away from the end of a seam so that I don’t have to deal with it at an intersection when joining other pieces. A while ago, a friend … Continue reading
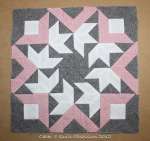
The block that has 112 pieces is finished. Baxter was inspecting it. It’s a variation of the Flying Swallows block, measures 10.86″ finished and was made using shapes from the Inklingo Free Diamond Square Triangle Collection. If you have the … Continue reading

What’s in the box?

Loads and loads of printed sheets for the New York Beauty blocks, both those from Collection 1 and Collection 2. Impossible for me to resist these. As though she knew, a very special friend sent me another one of these marvellous box books but this one is huge! Some of the sheets in that box are 8.5 x 12.5 inches and they aren’t folded over or cramped in there at all. The book box is that enormous and it’s deep so I can print as many sheets of fabric as I want for these blocks. It’s pretty clear now that the Tiffany Lamp quilt is going to be larger than I originally thought. I’m adding some batiks and a few other metallic prints that play nicely.

So on to hand piecing a New York Beauty block from Collection 2. I stitch the two bands of triangles and the small arc to the corner piece. When stitching the two bands of triangles, I take advantage of the continuous stitching possibilities so they’re done in next to no time.

At this stage, I press it. As the triangle intersections don’t meet when the two bands are joined together I’m quite happy to press both bands in the same direction.
Now all that’s left is to join the four units and the block is done. And it’s really that easy. With the perfect matching points and stitching lines, piecing a New York Beauty is fast, simple and oh, so gratifying as each block is done! Getting perfect sharp points takes nothing more than stitching on the stitching lines. The finished block will be shown tomorrow.
For a great tutorial on how to machine piece one of these beauties, check out this post on the All About Inklingo blog.

Baxter was ignoring the camera so Mr. Q.O. was making some very weird noises to get his attention. I think the look on his face says it, “What the heck?!” He had just been drinking in his wonderfully funny style, so the fur on the right side of his face is still quite damp.


A bright summery block of flying swallows seemed right for this little tutorial. Mr. Q.O. calls them bats, but …

There are a number of pieces in the block, but it really is an eight-point star made up of pieced 90-degree diamonds. Each of the pieced 90-degree diamonds is made up of 3 diamonds and 4 triangles. First piece the 3 diamonds together.

Then take advantage of the continuous stitching opportunity offered when adding the 4 triangles to the diamond unit as shown in this photo. Following the arrows, it’s possible to stitch all the triangles to the diamonds without breaking the thread.

Make sure the top and bottom triangles are placed the right way so that you end up with a larger 90-degree diamond.

While I usually wait until a block is completed to press it, this block is an exception. Pressing the pieced diamonds before joining them to one another makes the final pressing easier.

Join the 90-degree diamonds to create the eight-point star, making sure all the swallows are flying in the same direction.
Add the setting squares and triangles and the block is done. This block finishes at about 15″ and is destined to be part of a stitching book cover. I made it using the 6″ LeMoyne Star Inklingo collection, which has all the shapes to make the block other than the outer setting triangle.

Smudge found this whole process so calming that he fell asleep with some soft stuffed toys to keep him company!
~~~~~~~~~~
It seems that our ISP is bouncing some e-mails from friends. If you have e-mailed me in the past day or two and haven’t heard back, please let me know in a comment.

It was inevitable. I had to try out a Yin Yang block in my favourite of fabrics, shabby chic. As I have been asked some questions about how I put these together, I decided to do this little tutorial. The block is composed of four pieces of one identical shape. All the photos can be enlarged by clicking on them.

This shows the back of one piece and, if you click on the photo to enlarge it, you can see the matching points. They are what make this block go together like magic. I tried doing them before the Inklingo collection came out, and no matter how fine a line I drew or the matching points I put on, it just wasn’t fine or precise enough. With Inklingo printed matching points and crosshairs, there’s no worries at all — it all just fits together like a dream. I clip between the matching points on each concave curve to a few threads above the stitching line.

There are other ways to stitch these. My method is to start at the large curved end of the piece. I use two #12 sharps and pin at the crosshair and then at the first matching point.

I start by making my quilter’s knot and inserting the needle a stitch length over from the crosshair. I’ve found this works well when joining other pieces as the knot is not right at the crosshair. Then I take the needle to the back, back through to the front at the crosshair, make a quick back-stitch and carry on down to the first pin/needle. There are a lot of matching points and they are the secret to making the curve as smooth as can be.

As each matching point is reached, I take a little back-stitch and keep stitching. With a curve like this, I try to use the smallest stitches I can.

This photo shows the clips into the seam allowance done on the concave seam allowance of one of the pieces.

Once the first two pieces are stitched together, this is what they look like. As I’m hand piecing, I leave the pressing until the end.

Having stitched a few of these blocks, I’ve found that stitching them together into pairs and then joining those pairs works best for me.

The next step is joining the two pairs together. Once again, I start at the large, curved end and pin with two #12 sharps — one at the crosshair and one at the first matching point.

After stitching the third seam, the block now looks like this.

I line up the fourth and final seam and pin through the crosshair and first matching point.

Start with the thread slightly over from the crosshair and take the needle to the back.

As this is the last of the seams to stitch, I circle the intersection by inserting the needle through the first pair of fabrics at the crosshair and drawing it through. Circling the intersection ensures that there’s not a little hole at the intersection of all four shapes.

Then the needle is drawn through the next pair at the crosshairs.

The needle is drawn through the final pair at the crosshairs, a quick back-stitch is made and all that’s left to stitch is the final seam.

Daphne, who hasn’t been seen often since her flapper adventure on the roof garden a few years ago, showed up to see the block when the stitching was finished. At this point, the block hasn’t yet been pressed.

The block presses like a dream and the magic happens again. The block lies perfectly flat. No bump in the centre, no distortion.

The back of the block after pressing. Don’t you think it would be fun to stitch one of these? Be warned, though. They’re addictive as can be to stitch. You can’t stitch just one. I’ll be back with another post this afternoon with a giveaway that’s related to this tutorial.
Smudge wasn’t all that interested and decided to have a nap on my desk chair.

