

All we’ve heard for the past few days is that there’s a big snowstorm headed right for us so I decided yesterday I needed to make a block that really felt like summer. So pinks and greens were my choice for another Castle Wall block.
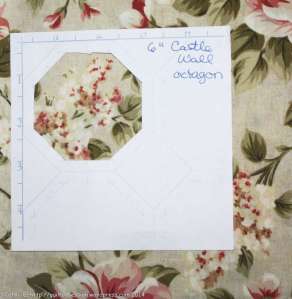
The first thing I did was use my window template to audition some fabrics to fussy cut for the centre octagon. The fabric in this photo wasn’t the one I used.

Instead I used what was probably the last useful bit of this fabric for fussy cutting. I have been fussy cutting bits from this fat quarter for years and this is all that’s left. I’m not quite ready to toss this, though. I might be able to get one more fussy cut bit out of it.

Then I chose the fabrics to go with the octagon and printed and cut out all the shapes.
As usual, I look for as many continuous stitching possibilities as I can. I used the Inklingo 6″ Castle Wall collection to make this block but this stitching sequence will work for any of the sizes.
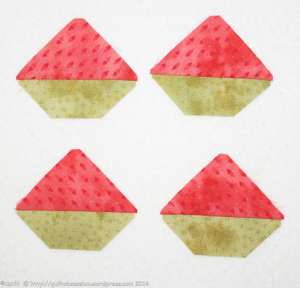
The first stitching I did was to join the four HSTs to four of the trapezoid shapes. That’s the only stitching that wouldn’t be continuous stitching, so I wanted to get that done.

Then it’s time to start building the castle wall. For the first bit of continuous stitching, the octagon together with a square and two diamonds are needed.

Begin by stitching the square to one of the diamonds.
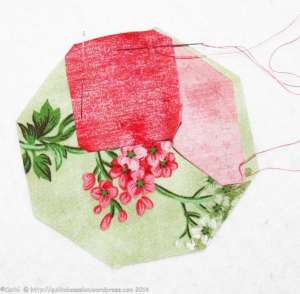
Then stitch the next side of the square to the octagon.

And then to the side of the second diamond. So far three seams have been stitched without having to knot and cut the thread, but once the square is stitched to that second diamond, it is time to make a knot and cut the thread. (And yes, you do see some extra printed lines in red on the back of the octagon. I made a mistake when printing and, as that was the last piece of the fabric that was usable for the octagon, my solution was to just reprint using a different ink colour. I have no worries about that extra ink as I have tested and know that the ink will wash right out.)
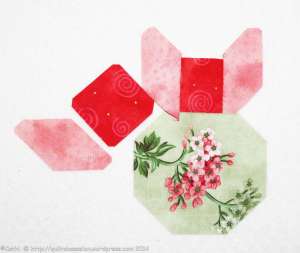
For the next step, another square and diamond are added.

So pick up the next square and repeat the steps by stitching it to the diamond attached to the previous square, then to the octagon and then to another diamond. And so on until all the diamonds and all but one square have been attached.

Then there will be one square left, which is attached by the same sequence – attaching to one diamond, then the octagon and then to the final diamond side.

Once that square is added in, it looks like this.

At this point, I like to grade and press the seams.

Now it’s time to start adding the trapezoids. And that means loads and loads of continuous stitching. Because I’ve already joined the HSTs to four of the trapezoids, I will just alternate adding a trapezoid and the trapezoid/HST combination and then, once I finish this step, the block will be done.

Just start adding either a trapezoid or trapezoid/HST combo to the diamonds and squares and keep stitching until they’re all added. Once all eight trapezoids are added, all that’s left is to grade the final seams and then press the block.
The front of the finished block.

And the back.
“Design Wall.”

Jake was a little sleepy, I think.

This may be my favourite shot of Baxter. But I say that a lot. He just is a very photogenic kitty!


Cathi I love the fabrics you chose for this block. I really like the step by step of how to piece as well. Beautiful block!
LikeLike
Thank you Cathi! I just started this block yesterday and I unpicked 3 times. Because I was putting it together wrong. I am printing your explanation out and putting it beside my chair! Thanks again!
LikeLike
Beautiful block. My favorite colors. Thanks for the detailed instructions. It makes it so much easier for my aged brain to understand. I too am going to print them out. Have a peaceful day
LikeLike
Pingback: All About Inklingo » Blog Archive » Inklingo Castle Wall Quilt in Electric Quilt
Fabulous Cathi. You have made it look so easy and the tutorial is brilliant. You are such a great ambassador for Inklingo.
Shirley.
Sent from my iPad
LikeLiked by 1 person
Your Castle Wall blocks are just fabuous, Cath! GREAT stitching sequence tutorial. And Baxter and Jake are definitely Kings of the Castle at your house! I’m enjoying Mr Q.O.’s ‘toons in the Castle too. What fun!
LikeLike
I responded to your post as I really appreciate your help. I said that I would copy this as a reference, but do I need your permission for that? I want to respect your work.
Laura
LikeLike
What a(nother) beautiful block! I agree about needing something summery, I’m ready for some sunny spring weather, we too have had a very gray, cold winter.
Thank you for this wonderful tutorial. I know it’s time-consuming to do it, so I really appreciate your efforts.
~Jillian
LikeLike
Beautifully done. Thank you for the tutorial. I love the spring colors. I need spring!
Sandy ( dealing with 10 inches of snow in her driveway) White
LikeLike
Super tutorial, and the Toon, I can see similarity right there. As always, super photos of the two dudes, very photogenic, both of them. Cheers from Jean
LikeLike
Super Tute! You are a gem! Thanks again.
LikeLike
Toot! toot! Great tutorial and thank you! I am gathering courage!
LikeLike
Now I am really set to start on my Castle Wall blocks now I have got my fabrics. Thanks for the tips. I look forward to trying them.
LikeLike
Another pretty block by Cathi……but that’s not surprising! An alien design wall would be very useful to have, I’m sure. Great pics of the kitties!
LikeLike
Pingback: All About Inklingo » Blog Archive » Inklingo Castle Wall Sewing Sequence
Thanks for the tutorial and pics. Great job!
LikeLike
I’ve been thinking this for a while, but today’s photo cinches it. Jake reminds me a lot of our first ever cat: Twit (named that because of his drunken antics before we found out he had rickets, but by the time he was better, the name had stuck). Right down to the pink nose, which unfortunately is what took away our friend too soon. So although I love Baxter, the big handsome man, I have a soft spot for Jake.
Looks like you’re enjoying the castle blocks. It took me a little bit at first to figure out the why of the name. But the turrets are easy to see now. Especially the one you did the other day with red turret stones
LikeLike
Pingback: All About Inklingo » Blog Archive » How to Press Inklingo Castle Wall Blocks – 1
Pingback: All About Inklingo » Blog Archive » How to Press Inklingo Castle Wall Blocks – 2
What a wonderful block..perfect for handpiecing and great colour choices.
LikeLike
I have gotten behind in my reading but found this page today and fell in love with your kittens. Just want to hug them. I have been without any since moving in with my mom and really miss them. Love your designs/quilts.
Sue in Indiana
LikeLike
Pingback: All About Inklingo » Blog Archive » Castle Walls in Nashville TN