
Another block I wanted to try out was the twisted hexagon. It’s a very fun little block to stitch, made up of one hexagon and six “other half” hexagons of the same size. As I had some of the other half hexagons and hexagons already printed in the 1″ size, that was what I used.

I started out with 2 white hexagons and 12 other half hexagons laid out.
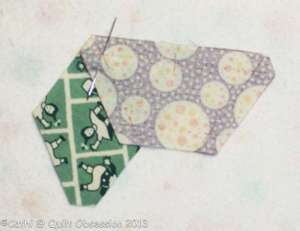
The first step is to join two half hexagons. So I pinned, using a #12 sharp as a pin, at the end of the seam.

Then I began stitching at the centre of the long side on top. With the shapes printed on fabric with Inklingo, it’s really easy to find the centre as it’s marked with a matching point which you can see if you click on the photo to enlarge. That’s where the threaded needle is inserted to start stitching.

The little half seam is stitched in a few seconds.

Then add the third half hexagon and pin and stitch the half seam.

At this point half the surrounding frame is done.

Add the fourth half hexagon, pin and stitch the half seam.

Now it will look like this.

Add the fifth half hexagon, pin and stitch the half seam.
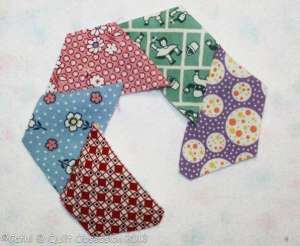
Once that’s stitched, it will look like this.

Add the final half hexagon, pin and stitch the half seam.

Now it’s time to add this frame of the other half hexagons to the centre hexagon.
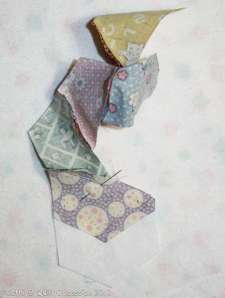
Pin the other half of the seam of the beginning half hexagon to the centre hexagon, stitch to the end and backstitch. Don’t cut the thread though.

Pass the threaded needle through the intersection, pin the next half seam on to the centre hexagon and stitch to the end of that little seam.

Continue in that manner until all six of the half hexagons have been sewn on to the centre hexagon. The last seam is a full seam, half attached to the centre hexagon and the last half to the first half hexagon. This is a great opportunity for continuous stitching. I attached the half hexagon frame to the centre hexagon with one length of thread.

I had so much fun making the first one that I couldn’t resist making a second.

After looking at it pressed both ways, I decided I preferred how it looks with all the seams pressed away from the centre hexagon towards the outer half hexagons. With the seams graded, it doesn’t create much bulk at all.

Earlier yesterday Baxter was lounging on his kitty tree. This is the time of year I start wishing for spring and the leaves on the trees as they hide a lot of the concrete jungle out there.

Baxter was teaching a class on twisted hexagons. I’m told his diploma is in the safe use of a rotary cutter, but I’m not sure I’d leave one anywhere within his reach.


yesterday we had an Ontario Bloggers hook up, I forgot about you, please forgive me? Anyhow there is a link again to the lady who hosted it on my blog again today if you fancy a trip around Ontario?
Gill
LikeLike
So Pretty! I love this block, I have some 1930’s fabrics I got for my birthday, will have to give inklingo a try.
LikeLike
that was a great tutorial – I love this framed hexagon – what shape collection is this one in?
LikeLike
Oh Cathi!!!!!! I love love love you!!!!! I want to make this quilt but looking at that picture just boggled my mind. Thanks so very very much!!! This one is next after the three I have in progress.
LikeLike
Thanks for the great tutorial Cathi. I have just added this to my list of “must make” quilts. It is perfect for the scrappy look that I love. Now all I have to do is decide which size – there are so many to choose from!
LikeLike
Great tutorial! Thanks!
If Baxter does get ahold of a rotary cutter, I think you’ll be making a lot of string quilts!
LikeLike
Ooooh! I love that! Especially the fabrics. (giving Baxter a hug)
LikeLike
Darling blocks…perfect for scraps! I hadn’t even realized that
Inklingo had this shape…how cool! I think I need a life…or at
least a new one…so much I would prefer to be doing…like these
blocks! 🙂
Hugs!
LikeLike
Fab tutorial Cathi! You make it easy!
LikeLike
I think these are stunning and VERY, VERY SMALL. I think you ought to share with us the strength of your prescription reading glasses! LOL such tiny hexies.
I saw in a very old quilt magazine, a story on a woman who had done a complete doll blanket in mini Sunbonnet Sues. Each square was 1″. I cant even imagine that..talk about your postage stamp quilt.
This is going to be like a real flower arrangement, so pretty.
Have a super weekend Cathi.
Cheers from Oshawa,
LikeLike
If the hexagon is 1″ then the twisted hexie isn’t much bigger, is that right? Oh yes, I don’t blame you, and Baxter, for enjoying your trees more than the other buildings! Perhaps Baxter’s certificate is for design…..I would hate to think of him let loose with a rotary cutter.
LikeLike
The finished twisted hexagon measures 3.5″ from point to point.
Cathi
LikeLike
What a fun block, Cathi. Thank you for writing out such clear directions for assembly. I like the fabrics you chose… so fresh and clean looking. Hmmm maybe this will be my next handpiecing project. I already have the Inklingo Collections, so I’m all set! lol
Baxter, as always, is handsome and amazing!
LikeLike
Hi Cathy, Great eye candy!! Where on the Internet can one print out the hexies needed for this tutorial..
Thanks bunches,
Linda J
VA
LikeLike
All the Inklingo hexagon collections contain the shapes needed to make the Twisted Hexagon block.
LikeLike
I love that everyone has found my love of English PPing these days! I did a 4200 piece tumbler block by hand in the last decade and now am inching myself through a new quilt using the same trapezoids you got going – love your use of them!! interesting!! I’m using them in a pinwheel formation. I usually only take it out a few months each year and do a few more blocks – little by little I’ll get that quilt done – the project is on my blog tagged under pinwheels if you care to take a look!
LikeLike
My twisted hexagons aren’t English paper pieced. They were made with a simple, running hand stitch as with the Inklingo hexagon collections, as with all Inklingo collections, the stitching (and cutting) lines are printed right on the back of the fabrics. Much, much easier and faster than English paper piecing — no papers to baste over, no whip-stitching required and no papers to remove at the end!
LikeLike
I wouldn’t have thought of sewing the frame first. Great tip.
Baxter looks very comfortable. I can see why you long for spring to hide the oter apartments though
LikeLike
thanks, Cathi! I appreciate this tutorial ~ I don’t think I would have tried this block before.
LikeLike
I love this block, and the handwork looks divine. I am considering purchasing the Inklingo system. But what are graded seams? Please email the answer if you do not mind. Thank you.
LikeLike
OK, now I am really lost. Which hexagon collection? They are sized. I would guess 1 inch? Thank you.
LikeLike
I love this tutorial by you and Baxter. Great block! I may have to try this one once I have finished my grandmother’s flower garden quilt.
LikeLike
Wonderful tutorial. I need to get out my cd collections and see what I have to start printing. I have a bunch of 1930 prints that would look nice with this pattern design. Thanks!
Gail in Verona
LikeLike
I also love your star quilt in you header. Did you make that with Inklingo too? What design is it or which set do I need to order from Linda?
LikeLike
I see you have done this by hand stitching. Is it possible to do it by machine? I have bad arthritis in my hands.
LikeLike